Key Takeaways
- Small format CNC machines (with cutting areas under approximately 24” x 36”) deliver professional results in garages, sheds, basements, and compact commercial shops without requiring a dedicated room.
- The right machine balances footprint, usable work area, frame rigidity, and software compatibility—not just price or maximum travel distance.
- This article focuses on helping you choose a small format CNC machine, with Simply Technologies (simplytechnologies.xyz) offering compact, shop-friendly solutions designed for real-world workshop constraints.
- You will get concrete guidance on space planning, power and dust collection needs, and upgrade paths specifically tailored for tight shop spaces.
- Planning ahead for clearances, dust management, and future growth prevents costly mistakes and ensures your CNC integrates smoothly into your workflow.
Introduction: Why Small Format CNC Machines Belong in Modern Shops
The days when CNC technology required a factory floor are long gone. Today, a small format CNC machine can sit in a 20-foot garage, a basement corner, or a compact commercial space—and still produce work that rivals professional production shops. For makers, small business owners, and serious hobbyists, this shift opens doors that were closed just a decade ago.
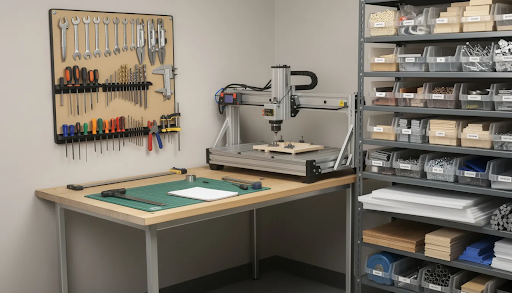
What exactly qualifies as a small format CNC? Generally, these are machines with cutting areas ranging from about 12” x 12” up to 24” x 36”, designed as benchtop units or compact floor-standing systems. They fit on standard workbenches, roll into corners, and run on household power. Despite their size, they handle precision carving, routing, engraving, and even light metalworking with accuracy that makes them genuinely useful production tools.
Here’s why small format CNC machines are ideal for space-limited shops:
- Typical users include: home woodworkers, Etsy sellers, sign making businesses, prototyping labs, makerspaces, and small commercial shops working in under 400 square feet.
- Common materials: birch plywood, MDF, hardwoods like maple and walnut, acrylic, HDPE, and soft metals like aluminum (6061) at conservative feeds.
- Practical integration: these machines tuck against walls, sit on rolling carts, and leave room for other tools without dominating your space.
- Entry point to CNC: they provide an efficient manufacturing process for small-batch production without the learning curve or expense of industrial equipment.
Simply Technologies (simplytechnologies.xyz) specializes in compact CNC solutions designed for real-world workshop integration. Their focus is on machines that fit cleanly into the spaces where people actually work—not idealized factory floors.
Understanding Small Format CNC: Core Concepts and Capabilities
Before you start comparing specs, it helps to understand what a small format CNC machine actually does and where its strengths lie. These aren’t scaled-down industrial mills—they’re purpose-built tools optimized for precision work on smaller parts.
A small format CNC operates on three axes of motion: X (left-right), Y (front-back), and Z (up-down). A spindle holding a rotating cutting bit moves along these axes according to programmed instructions, carving material away to create your design. This basic principle applies whether you’re cutting cabinet parts from plywood, engraving acrylic panels for signage, or milling small aluminum brackets.
Here’s what you need to know about core capabilities:
- 3-axis motion translates into carving signs, cutting joinery, creating intricate designs in wood, and machining soft metals. The Z axes handle depth control for operations like pocketing, profiling, and V-carving.
- Typical work envelope sizes and what they support:
- 12” x 12” to 12” x 18”: coasters, small signs, jewelry boxes, PCB milling
- 18” x 24”: name signs up to 18” wide, cutting boards, small cabinet doors, custom plaques
- 24” x 36”: larger signs, furniture panels, multiple small parts nested on one sheet
- CAD/CAM software turns your digital design into G-code—the instructions your machine follows. Design software like Fusion 360, VCarve, or free options like FreeCAD generate toolpaths that the CNC controller executes. Simply Technologies focuses on machines compatible with mainstream hobby and professional CAD/CAM packages, ensuring you aren’t locked into proprietary ecosystems.
- Realistic performance expectations: small format machines excel at precision and repeatability for small to medium parts. They’re not built for high volume 4×8 sheet processing or heavy metal removal. Expect tolerances in the range of 0.01 to 0.1mm depending on the machine and setup—more than adequate for woodworking, sign making, and prototype work.
The cnc routing machine category spans everything from hobbyist kits to professional-grade benchtop units. Understanding where your needs fall helps you avoid both overspending and underbuying.
How to Match a Small Format CNC Machine to Your Shop Space
Space planning is where many first-time buyers stumble. A machine that looks perfect on a website can become a nightmare if it blocks your garage door, leaves no room for material handling, or crowds out your existing tools.
The key distinction is between machine footprint (the total floor or bench space the machine occupies) and cutting area (the actual work area where you can place and cut material). A machine with an 18” x 24” cutting area might have an overall footprint of 30” x 34” or larger once you account for the frame, motors, and control electronics.

Here’s how to approach space planning:
- Measure both the bench and circulation space. Don’t just check if the machine fits—ensure you have room to load material, access clamps, connect dust collection, and reach the power switch without contortion.
- Recommended minimum clearances:
- At least 24” behind the machine for cable access, dust hose routing, and any rearward gantry travel
- At least 24” in front for loading/unloading material and operating the control interface
- At least 18” on one side for accessing clamps, bit changes, and emergency stops
- Layout examples for common spaces:
- A 20’ x 20’ garage shop: place the small format CNC against a wall or on a mobile cart that tucks under a workbench when not in use
- A 10’ x 12’ basement room: use a folding or rolling bench that can shift aside for other projects, keeping the CNC as one station in a multi-purpose space
- Vertical space matters too. Consider gantry height, Z-axis travel (typically 2” to 6” for small format machines), and overhead room for dust hoses, enclosures, or lighting. A machine with 4” of Z travel needs clearance above that for the spindle motor itself.
Simply Technologies emphasizes compact frames and clean cable management so their machines fit along walls, in corners, or on standard 2’ x 4’ workbenches without trailing wires or awkward protrusions.
Key Factors When Choosing a Small Format CNC Machine
Once you’ve mapped your available space, the real selection work begins. Here are the factors that matter most for small shop buyers:
Work Area vs. Footprint
Many small shops find an 18” x 24” or 24” x 36” cutting area to be the sweet spot between capability and space usage. These sizes handle most sign making projects, furniture components, and prototypes without requiring a dedicated CNC room.
| Cutting Area | Typical Footprint | Best For |
| 12” x 12” | ~20” x 20” | Small signs, coasters, PCBs |
| 18” x 24” | ~28” x 34” | Name signs, cutting boards, cabinet parts |
| 24” x 36” | ~34” x 46” | Larger signs, furniture panels, batch work |
Rigidity and Frame Design
A rigid frame prevents chatter, improves accuracy, and extends tool life. Look for:
- Solid linear rails (not V-wheels on aluminum extrusion, which wear faster)
- Ball screw drive systems where available—these offer superior backlash-free performance
- Stiff gantry construction, often from cast aluminum or stress-relieved aluminum extrusions
Rigidity matters more than chasing maximum travel distance. A smaller, stiffer machine outperforms a larger, flexible one on precision work.
Material and Application Focus
Match the machine to your primary work:
| Application | Spindle Power | Key Features |
| Sign making in wood/acrylic | 0.5–1.0 kW | V-bit compatibility, smooth Z motion |
| Small furniture components | 1.0–1.5 kW | Higher torque, robust workholding |
| PCB milling | 0.3–0.5 kW | High precision, minimal runout |
| Aluminum brackets | 1.5–2.0 kW | Water-cooled spindle, high rigidity |
Different materials demand different approaches. You can cut wood and acrylic at aggressive feeds, but aluminum requires slower speeds and proper chip clearing. A versatile machine handles various materials without sacrificing quality on any of them.
Accuracy and Repeatability
For most small format hobby and prosumer machines, expect repeatability in the range of 0.005” to 0.010” (0.13mm to 0.25mm). This level of precision supports:
- Tight-fitting joinery
- Inlay work requiring matched pockets and inserts
- Multi-sided machining where parts must align after flipping
- Engraving with consistent depth across the work area
High performance machines achieve even tighter tolerances, but for woodworking, sign making, and light metalworking, this range delivers professional results.
Spindle Speed and Cutting Capability
Spindle speed ranges typically span 10,000 to 30,000 RPM for small format CNC machines. Higher speeds suit smaller bits and finish passes; lower speeds with more torque handle larger cutters and harder materials. High speed cutting capability matters for efficient manufacturing of detailed work, but the spindle must match your material—running too fast in aluminum causes tool wear and poor finishes.
Noise, Dust, and Vibration
If your shop shares walls with living space—or neighbors—these factors become critical:
- Trim routers are loud (85–95 dB); spindles tend to run quieter (70–85 dB)
- Even a small CNC generates significant fine dust that must be controlled
- Vibration from unbalanced spindles or lightweight frames transfers through workbenches
Simply Technologies designs pay special attention to these concerns, incorporating features that reduce noise transmission and integrate cleanly with dust collection systems.
Support, Documentation, and Learning Curve
The best cnc machines come with clear setup guides, example projects, and responsive support. This matters more than raw specs for most buyers. A machine with excellent documentation saves hours of troubleshooting and gets you making projects faster. Simply Technologies positions itself in this support role, providing resources that help users with limited experience succeed quickly.
Power, Dust Collection, and Safety in Tight Spaces
Integrating a CNC into a small shop means dealing with practical infrastructure constraints. Here’s what you need to plan for:
Power Requirements
- Most small format CNCs run on standard 110–120V circuits at 10–15A
- Dedicate a circuit when possible to avoid tripping breakers during high-demand operations (spindle startup draws significant current)
- Keep the computer on a separate circuit or use a surge protector to prevent power fluctuations from affecting your control system
- Machines with 2+ kW spindles may require 220V—verify before purchasing if you only have standard outlets available
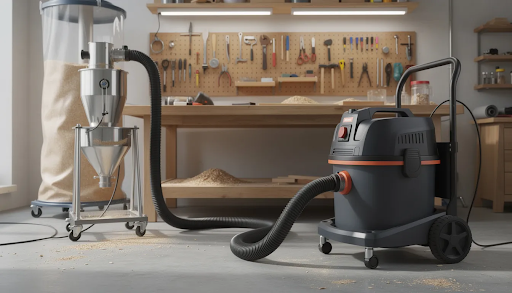
Dust Collection
Even a small CNC cutting 3/4” plywood produces continuous fine dust. This isn’t optional to address:
- Use a shop vacuum or small dust extractor with 1.25” to 2.5” hose diameter
- A dust shoe mounted around the spindle captures chips at the source
- Plan for 40–100 CFM extraction capacity for effective chip clearing
- MDF and certain hardwoods produce especially fine particles that require good filtration
- Regular maintenance of filters and hoses keeps extraction effective
Noise Control
Realistic noise levels for small format CNCs:
- Trim routers: 85–95 dB (comparable to a gas lawn mower)
- Spindles: 70–85 dB (closer to a vacuum cleaner)
For home shops or attached garages, consider:
- Enclosures lined with sound-dampening material (MDF panels with acoustic foam)
- Running the machine only during reasonable hours
- Quieter spindle options that trade some power for reduced noise
Safety Practices
CNC machines remove material quickly and don’t distinguish between wood and fingers. Essential practices include:
- Always stay in the room while the machine runs
- Secure workpieces with clamps, T-track systems, or vacuum tables
- Wear hearing and eye protection
- Keep the work area clear of loose tools and materials
- Know where the emergency stop is and test it before your first cut
- Never reach into the cutting area while the spindle is running
Simply Technologies provides guidance on power, dust, and safety setup for their compact CNC systems, helping new users integrate machines responsibly into small spaces.
Budget and Total Cost of Ownership for Small Format CNC Machines
Understanding the full cost picture prevents sticker shock after you’ve already committed. Here’s how to budget realistically:
Initial Machine Cost
| Category | Price Range | What You Get |
| Entry-level kits | $500–$1,500 | Basic frames, often require assembly and tuning |
| Mid-range benchtop | $1,500–$4,000 | Better rigidity, included spindle, ready-to-run |
| Professional compact | $4,000–$10,000 | Ball screw drives, water-cooled spindles, tighter tolerances |
The best cnc machines for small business use typically fall in the mid-range category, offering enough rigidity and features for production work without requiring industrial infrastructure.
Essential Accessories
Budget several hundred dollars beyond the machine itself for:
- Bits and end mills (starter sets run $50–$150; ongoing replacement adds up)
- Clamps, T-track, or workholding fixtures ($50–$200)
- Spoilboard material (MDF sheets, $20–$50 per replacement)
- Dust shoe and extraction setup ($50–$150)
- Enclosure materials if needed ($100–$500 depending on complexity)
Software Costs
- Free/open-source options: GRBL controller software, FreeCAD, Carbide Create (limited features)
- Paid CAD/CAM software: VCarve ($350–$700), Fusion 360 (subscription), Aspire ($2,000+)
- Serious small businesses should budget for professional-grade software if they plan production work—the efficiency gains pay for the license quickly
Operating Costs
- Bit replacement: varies widely based on materials and run time; budget $10–$50/month for active use
- Maintenance supplies: lubricants, filters, replacement brushes ($50–$100/year)
- Electricity: typically under $0.50/hour of operation for small format machines
- Time investment: learning curve of 10–20 hours to reach proficiency; ongoing learning as you tackle new materials and techniques
Simply Technologies focuses on transparent pricing and clearly listing what is and is not included so buyers can accurately budget for a complete, ready-to-cut setup. This saves money by preventing surprise accessory purchases.
Planning for Growth and Future Upgrades in a Small Shop
Thinking beyond your first year of CNC use prevents outgrowing your machine before it pays for itself.
Modularity and Upgrade Paths
Look for machines that support upgrades without requiring a complete replacement:
- Rotary axis addition: a 4th axis or fourth axis attachment enables turning work like spindles, columns, and cylindrical engravings—often mountable within the existing work area footprint
- Additional axes: some platforms support a 5th axis for more complex geometry, though this typically requires significant investment
- Spindle upgrades: swapping from a trim router to a water-cooled spindle improves cut quality and reduces noise without changing the frame
- Extended work area: some modular designs allow adding travel length without expanding width, fitting taller signs or longer parts into the same floor space
- Multiple axes of motion open doors to more complex projects as your skills develop
Storage and Organization
Plan for storing:
- Fixtures and jigs specific to your common projects
- Clamps, hold-downs, and T-track accessories
- Bit sets organized by type and size
- Raw materials (sheets of plywood, acrylic stock, aluminum blanks)
If your CNC sits on a rolling cart or shared workbench, add nearby shelving or a mobile tool cart to keep everything accessible without cluttering the cutting area.
Scalability for Small Business
A realistic progression for small business growth:
- Start with small products (custom signs up to 18” wide, engraved cutting boards, personalized gifts)
- Build a catalog and refine your efficient manufacturing process
- Add fixtures for batch production of popular items
- Consider a second machine or larger format only after maxing out the first machine’s capacity
This approach saves money and avoids committing floor space before you’ve proven demand.
Simply Technologies designs its small format CNC offerings with upgrade-friendly components and clear mechanical layouts to support future expansions where feasible. This means your first machine can grow with your capabilities rather than becoming obsolete.
How Simply Technologies Helps You Choose the Right Small Format CNC
Finding the right machine among dozens of options can feel overwhelming. Simply Technologies (simplytechnologies.xyz) focuses specifically on compact CNC solutions for space-constrained shops.
Here’s how they support small shop buyers:
- Curated compact configurations: machines optimized for home garages, maker studios, and small commercial spaces, emphasizing clean cable routing and minimal footprint—typically under 600mm x 600mm overall
- Detailed specifications: the website provides exact machine dimensions, wiring diagrams, and practical setup guides tailored to users with limited room and standard household power (110–120V)
- Educational content: step-by-step setup tutorials, starter project ideas (like simple sign making or engraving projects), and guidance on choosing bits and feeds/speeds for common materials like birch ply, MDF, acrylic, and aluminium
- Space-based selection: prospective buyers can explore machine options by work area, available space, and budget, getting help aligning choices with their specific products and shop layouts
- Ongoing support: documentation for troubleshooting common issues, maintenance schedules, and upgrade options as your needs evolve
Whether you’re a hobby woodworker starting your first CNC projects or a small business scaling up production, simplytechnologies.xyz provides the guidance to match the right tool to your space and goals.
FAQ
These frequently asked questions address common concerns that come up when selecting and setting up a small format CNC machine in a tight space. If your question isn’t covered here, simplytechnologies.xyz offers detailed resources and support for specific scenarios.
What is the smallest practical CNC size for a serious home or garage shop?
While there are tiny desktop units under 12” x 12”, most users who want to make sellable products find that a cutting area around 18” x 24” is a practical minimum. This size handles name signs up to 18” wide, standard cutting boards, small cabinet doors, and batches of smaller items like coasters or plaques.
The physical footprint of such a machine typically remains under about 30” x 34”, fitting comfortably on a standard workbench or small rolling cart. If your space allows, stepping up to roughly 24” x 36” opens more possibilities—larger signs, furniture components, and more efficient nesting of multiple parts—without requiring a full dedicated room.
For most home shops and serious hobby use, this 18” x 24” to 24” x 36” range provides the best balance of capability and practical space requirements.
Can I put a small format CNC machine in an apartment or upstairs room?
It is physically possible—most small format machines weigh under 50 kg (110 lbs), well within the load capacity of standard floors. However, noise and dust control become critical considerations.
To make apartment or upstairs operation practical:
- Use a full enclosure around the machine to contain dust and dampen noise
- Choose a quiet spindle rather than a trim router (difference of 10–20 dB)
- Install a compact dust extractor with a HEPA filter to protect indoor air quality
- Add anti-vibration pads or feet under the machine to reduce transfer through the floor
Plan to run the machine only during reasonable hours, and always stay in the room while cutting to manage any issues quickly. Neighbors in adjacent units will appreciate the consideration—and you’ll avoid complaints that could shut down your hobby entirely.
How much dust and noise does a small format CNC really produce?
Even a compact CNC cutting 3/4” plywood or MDF produces continuous fine dust and noise roughly similar to a shop vacuum plus a handheld router running together—easily 80–90 dB combined for router-based spindles.
Plan for:
- Hearing protection (earplugs or muffs) for any extended cutting session
- Dust collection directly at the spindle with a proper dust shoe
- Sound insulation around the machine if you’re in shared or attached spaces
- Eye protection against flying chips, especially when cutting metal or acrylic
MDF produces particularly fine dust that hangs in the air and poses respiratory risks. A good dust extraction system isn’t optional—it’s essential for both health and keeping your shop clean enough to work in.
You can find setup examples and dust-control suggestions tailored to specific machine sizes on simplytechnologies.xyz.
Do I need a powerful computer to run a small format CNC machine?
Most small format CNC controllers require only a modest computer for sending G-code. A basic laptop or desktop running Windows or Linux handles the real-time control tasks without issue. The machine controller does the heavy lifting; your computer just streams instructions.
However, CAD/CAM design work benefits from a reasonably recent machine—a mid-range laptop from the last 3–5 years with at least 8GB RAM and an Intel i5 or equivalent processor. Complex 3D carvings with many toolpath calculations run faster on better hardware, but basic sign making and 2D cutting aren’t demanding.
Keep the computer near the CNC but protected from dust—a covered shelf or cabinet works well. Dust infiltration is the enemy of electronics, and a CNC shop generates plenty of it.
How long does it take to go from unboxing to making the first project?
For most small format CNCs, careful assembly, tramming (leveling the spoilboard relative to the spindle), and software setup takes a full weekend for a first-time user. This includes:
- Mechanical assembly (if required)
- Electrical connections and testing
- Software installation and machine configuration
- Learning basic G-code sending and machine control
- Tramming and surfacing the spoilboard
Users who follow structured tutorials can often complete a simple project—like a name plaque in pine or MDF—within their first 1–3 days of focused setup and learning. The learning curve steepens when you tackle harder materials or more complex designs, but that first successful cut builds confidence quickly.
Simply Technologies publishes step-by-step getting-started resources to shorten this learning curve and help new owners produce their first successful cut efficiently.